

How To Install Stacks On A Truck
In this tutorial, we will learn how to set up and configure the ROS Navigation Stack for a mobile robot. The video below shows the last output you will be able to reach one time you complete this tutorial.
What is the ROS Navigation Stack?
The ROS Navigation Stack is a drove of software packages that you lot can use to aid your robot move from a starting location to a goal location safely.
The official steps for setup and configuration are at this link on the ROS website, simply nosotros will walk through everything together, step-past-step, because those instructions go out out a lot of detail. Where possible, I will link to other tutorials that I've written that have detailed instructions on how to implement specific pieces of the Navigation Stack.
Of import: For your reference, all our code will be located in this folder, which I named jetson_nano_bot.
Real-World Applications
This project has a number of real-world applications:
- Indoor Commitment Robots
- Room Service Robots
- Mapping of Underground Mines, Caves, and Hard-to-Attain Environments
- Robot Vacuums
- Order Fulfillment
- Factories
Prerequisites
- You have already set your NVIDIA Jetson Nano (4GB, B01) with ROS. You can as well use an Ubuntu-enabled Raspberry Pi that has ROS installed.
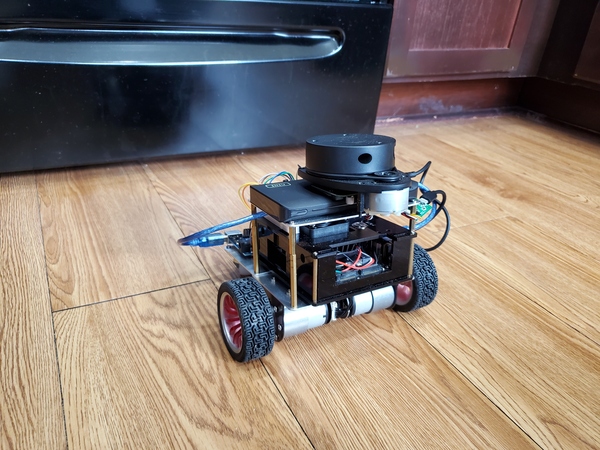
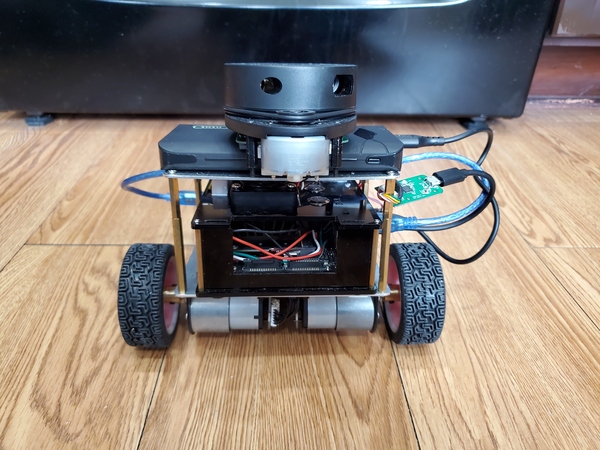
- Yous have a robot. I will continue with my ii-wheeled differential bulldoze robot. Hither is how my robot looks:
Install the ROS Navigation Stack
Let'due south outset by installing the ROS Navigation Stack.
Open up a new terminal window, and type the following control to install the ROS Navigation Stack.
sudo apt-go install ros-melodic-navigation
If you are using ROS Noetic, you lot volition type:
sudo apt-get install ros-noetic-navigation
To see if it installed correctly, type:
rospack observe amcl
You should see the following output:
/opt/ros/melodic/share/amcl
Create a Package
Allow's create a bundle inside the jetson_nano_bot folder. This package will contain our work for the ROS Navigation stack.
If yous don't already have a binder named jetson_nano_bot, create that now. Open a terminal window, and type:
cd ~/catkin_ws/src/
mkdir jetson_nano_bot
Open up a new terminal window, and type:
cd ~/catkin_ws/src/jetson_nano_bot
Create a package named navstack_pub.
catkin_create_pkg navstack_pub rospy roscpp std_msgs tf tf2_ros geometry_msgs sensor_msgs nav_msgs move_base
Get inside your navstack_pub package.
roscd navstack_pub
Add together a folder called param.
mkdir param
Go dorsum to your parcel.
roscd navstack_pub
Open CMakeLists.txt.
gedit CMakeLists.txt
Remove the hashtag on line 5 to make sure that C++11 support is enabled.
Save and shut the file.
Now permit'due south compile the package.
cd ~/catkin_ws/
catkin_make --only-pkg-with-deps navstack_pub
Now we're going to put together our launch file.
Open a new terminal window, and motion to your navstack_pub packet.
roscd navstack_pub
mkdir launch
cd launch
Create your launch file.
gedit jetson_nano_bot.launch
Add together the following code:
Save the file, and close it.
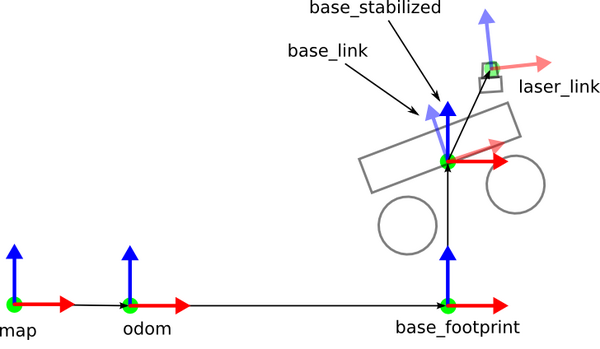
Transform Configuration
The ROS Navigation Stack requires that we publish data almost the relationships between coordinate frames of the robot using the tf ROS packet.
Open up a final window and blazon:
roscd navstack_pub
cd launch
Open your launch file.
gedit jetson_nano_bot.launch
Add the "Transformation Configuration…" cake of this code (you will need to download the launch file in order to copy the code) to your launch file. You lot will demand to modify it for your ain robot. A full explanation of how to do that can be found on this post.
Sensor Data
The ROS Navigation Stack uses sensor data to assist the robot avoid obstacles in the environment. It assumes that the sensor publishes either sensor_msgs/LaserScan or sensor_msgs/PointCloud messages over ROS.
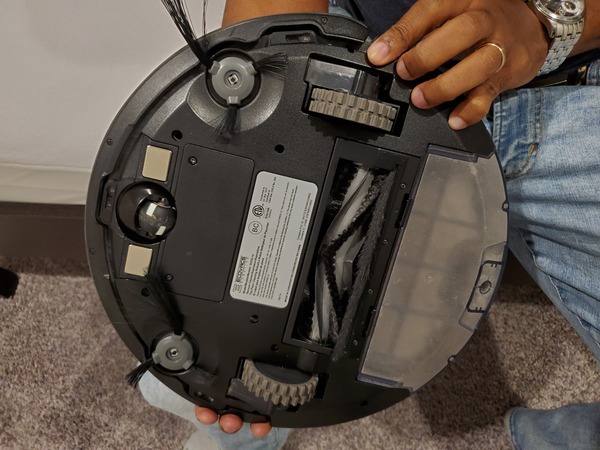
LIDAR Information
Open up a terminal window and blazon:
roscd navstack_pub
cd launch
Open up your launch file.
gedit jetson_nano_bot.launch
Add the "Lidar Information Publisher Using RPLIDAR…" block of this lawmaking to your launch file. This code requires no modifications. A full explanation of how to gear up your LIDAR and then the launch file can read it properly tin can be found on this postal service. The full tutorial for setting up your LIDAR from scratch can be found on this post.
Odometry Information
The navigation stack requires that odometry information exist published using tf and the nav_msgs/Odometry message. To set this up, you will need to take completed the post-obit three tutorials:
- Information from wheel encoders
- Data from the BNO055 IMU Sensor
- The robot_pose_ekf package, which uses an Extended Kalman Filter to fuse the data provided by the bike encoders and the BNO055 IMU sensor.
One time y'all accept completed the iii tutorials in a higher place, you can move to the side by side step to add the appropriate code to your main launch file.
Open a terminal window and type:
roscd navstack_pub
cd launch
Open your launch file.
gedit jetson_nano_bot.launch
Add together the "Bike Odometry Publisher" cake of this lawmaking to your launch file.
Add the "IMU Information Publisher Using the BNO055 IMU Sensor" block of this code to your launch file.
Add the "Extended Kalman Filter from robot_pose_ekf Node" block of this code to your launch file.
Base Controller
The ROS Navigation Stack requires a node that subscribes to the "cmd_vel" (i.due east. velocity control) topic that takes velocities and converts them into motor commands. To set this up, you volition need to have completed the following tutorial:
- How to Control a Robot's Velocity Remotely Using ROS
Once you lot accept completed the tutorial higher up, you tin can move to the next step to add the appropriate code to your main launch file.
Open a terminal window and type:
roscd navstack_pub
cd launch
Open up your launch file.
gedit jetson_nano_bot.launch
Add the "Wheel Encoder Tick Publisher and Base Controller Using Arduino" block of this lawmaking to your launch file.
Mapping Information
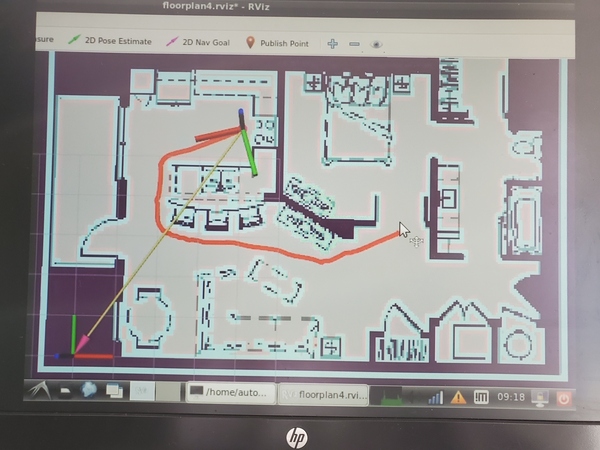
Yous practise not demand to have a map to run the ROS Navigation Stack, only I will assume nosotros accept a static map of our surround. The map enables u.s. to ready an initial pose for our robot and to give information technology a goal destination.
Y'all can create your map:
- Using LIDAR, or
- Using an prototype (e.grand. a floorplan of your firm, apartment, function, warehouse, etc.)
I created my map using the floorplan of my apartment. The full tutorial on how to do this is on this post.
Your map will consist of ii files: a pgm file and a yaml file. My files are named floorplan4.pgm and floorplan4.yaml .
Y'all volition also need a style to convert the initial pose of the robot and your desired goal destination into a usable format. I bear witness you how to exercise that in the tutorial beneath:
- How to Create an Initial Pose and Goal Publisher in ROS
In one case you have the two map files and your initial pose and goal publisher, you can add together the relevant lawmaking to your launch file.
Open a terminal window and type:
roscd navstack_pub
cd launch
Open your launch file.
gedit jetson_nano_bot.launch
Add the "Map File" block of this code to your launch file. This code loads the saved map files.
Add the "Map Server" block of this code to your launch file. This lawmaking calls on ROS to serve the map.
Add the "Initial Pose and Goal Publisher" block of this code to your launch file. This code enables you to launch RViz. You will need to delete the post-obit statement:
args="-d /home/automaticaddison/catkin_ws/src/jetson_nano_bot/navigation_data_pub/maps/floorplan4.rviz" Then that the unabridged block looks like this:
<!-- Initial Pose and Goal Publisher --> <!-- Publish: /initialpose, /move_base_simple/goal --> <node pkg="rviz" blazon="rviz" name="rviz" > </node> Add together the "Subscribe: /initialpose, /move_base_simple/goal" block of this lawmaking to your launch file. This code makes certain that, when you click the buttons in RViz to set the initial pose and the goal destination, the pose and goal get converted into a usable format.
Costmap Configuration (Global and Local Costmaps)
The ROS Navigation Stack uses two costmaps to store data about obstacles in the world.
- Global costmap: This costmap is used to generate long term plans over the entire environment….for example, to calculate the shortest path from betoken A to indicate B on a map.
- Local costmap: This costmap is used to generate curt term plans over the surround….for example, to avoid obstacles.
Nosotros have to configure these costmaps for our projection. We prepare the configurations in .yaml files.
Common Configuration (Global and Local Costmap)
Let'due south create a configuration file that volition house parameters that are common to both the global and the local costmap. The proper name of this file volition exist costmap_common_params.yaml.
Open a concluding window, and type:
cd ~/catkin_ws
roscd navstack_pub
cd param
gedit costmap_common_params.yaml
Add the costmap_common_params.yaml lawmaking to this file.
Save and shut the file.
To larn more well-nigh each of the parameters and what they mean, check out this link.
Global Configuration (Global Costmap)
Let's create a configuration file that will house parameters for the global costmap. The name of this file will be global_costmap_params.yaml.
Open a last window, and type:
cd ~/catkin_ws
roscd navstack_pub
cd param
gedit global_costmap_params.yaml
Add the global_costmap_params.yaml lawmaking to this file.
Salve and close the file.
Local Configuration (Local Costmap)
Let's create a configuration file that will house parameters for the local costmap. The name of this file will be local_costmap_params.yaml.
Open a terminal window, and type:
cd ~/catkin_ws
roscd navstack_pub
cd param
gedit local_costmap_params.yaml
Add the local_costmap_params.yaml code to this file.
Salvage and close the file.
Base Local Planner Configuration
In addition to the costmap configurations nosotros did in the previous department, we need to configure ROS Navigation Stack's base local planner. The base_local_planner computes velocity commands that are sent to the robot base controller. The values that you use for your base_local_planner will depend on your robot.
Open a terminal window, and type:
cd ~/catkin_ws
roscd navstack_pub
cd param
gedit base_local_planner_params.yaml
Add together the base_local_planner_params.yaml code to this file.
Relieve and close the file.
Move Base Node
Now that we have created our configuration files, we need to add them to the launch file. The configuration files will be used by ROS Navigation Stack's move_base node. The move_base node is the piece of work equus caballus behind the scenes that is responsible for planning a standoff-complimentary path from a starting location to a goal location for a mobile robot.
The motility-base of operations node subscribes to the following topics:
- /move_base_simple/goal : Goal position and orientation (geometry_msgs::PoseStamped). The letters on this topic are generated using the goal button on RViz.
The publisher will publish to the following topics:
- /cmd_vel : Linear and athwart velocity command (geometry_msgs/Twist Bulletin)
Open a terminal window, and type:
cd ~/catkin_ws
roscd navstack_pub
cd launch
gedit jetson_nano_bot.launch
Add the "Move Base Node" block of this code to your launch file. This code loads all the configuration files we take created so far. It too loads the move_base node.
AMCL Configuration
The ROS Navigation Stack requires the utilize of AMCL (Adaptive Monte Carlo Localization), a probabilistic localization system for a robot. AMCL is used to track the pose of a robot against a known map. It takes as input a map, LIDAR scans, and transform letters, and outputs an estimated pose. You can acquire more about this package here on the ROS website.
The amcl node subscribes to the post-obit topics:
- /scan : Laser scan letters from the LIDAR (sensor_msgs/LaserScan).
- /tf : Coordinate frame transformations (tf/tfMessage).
- /initialpose : The initial position and orientation of the robot using quaternions. (geometry_msgs/PoseWithCovarianceStamped) — RViz initial pose push button publishes to this topic.
- /map : The occupancy grid map created using gmapping, Hector SLAM, or manually using an image (nav_msgs/OccupancyGrid).
The amcl node will publish to the post-obit topics:
- /amcl_pose : Robot'south estimated pose in the map (geometry_msgs/PoseWithCovarianceStamped).
- /particlecloud: The set up of pose estimates being maintained past the filter (geometry_msgs/PoseArray).
- /tf (tf/tfMessage): Publishes the transform from odom (which tin can be remapped via the ~odom_frame_id parameter) to map.
Let'due south add together the AMCL node to the launch file.
Open up a terminal window, and type:
cd ~/catkin_ws
roscd navstack_pub
cd launch
gedit jetson_nano_bot.launch
Add the "Add AMCL example for differential drive robots" block of this code to your launch file. This code loads the ACML code for a differential bulldoze robot.
Launch the Democratic Mobile Robot!
We're well-nigh at the finished line!
Permit's compile the package. Open a new terminal, and type:
cd ~/catkin_ws/
catkin_make --only-pkg-with-deps navstack_pub
Turn the motors of your robot on.
Open a new terminal window and launch the launch file.
roslaunch navstack_pub jetson_nano_bot.launch
If necessary, gear up the topics for each of the RViz plugins so that yous tin run into the axis of your robot on the screen forth with the map and costmaps.
Set the initial pose of the robot by clicking the 2d Pose Approximate push button at the top of RViz and so clicking on the map.
Give the robot a goal past clicking on the 2D Nav Goal button at the top of RViz and and so clicking on the map.
Y'all should see the planned path automatically drawn on the map. Your robot should so begin to follow this path.

Open up a new terminal, and encounter the tf tree.
rosrun tf view_frames
evince frames.pdf
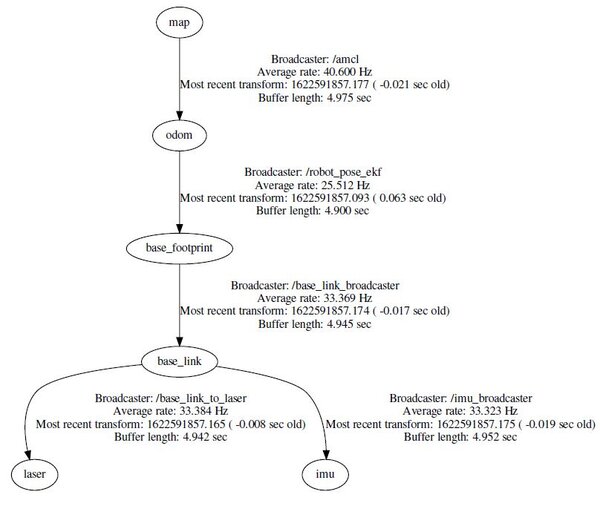
Open a new terminal and see the node graph.
rqt_graph
Here is the link to my node graph.
That's information technology! Congratulations on getting the ROS Navigation Stack up and running! Keep building!

Source: https://automaticaddison.com/how-to-set-up-the-ros-navigation-stack-on-a-robot/
Posted by: moorehichat.blogspot.com
0 Response to "How To Install Stacks On A Truck"
Post a Comment